When a friend of the family lost his iPhone 7 in a skiing accident, he was handed down an iPhone 11 from his daughter. Unfortunately, this device had already been through the wringer — repaired multiple times by one of those sketchy shopping center popup booths. The previous repairs had been less than stellar: pieces were loose, screws were rattling inside, and the battery had expanded, causing the screen to separate from the frame. To top it off, the back glass was cracked, and the display had been poorly replaced with a non-original part.
This iPhone 11 was in desperate need of a comprehensive restoration. However, the good news was that with the right tools and parts, I was confident this phone could be revived and handed back to its new owner in working condition. This phone may have been through many botched repairs, but today it would get the restoration it truly deserved.
The State of the Phone: A Closer Look at the Damage
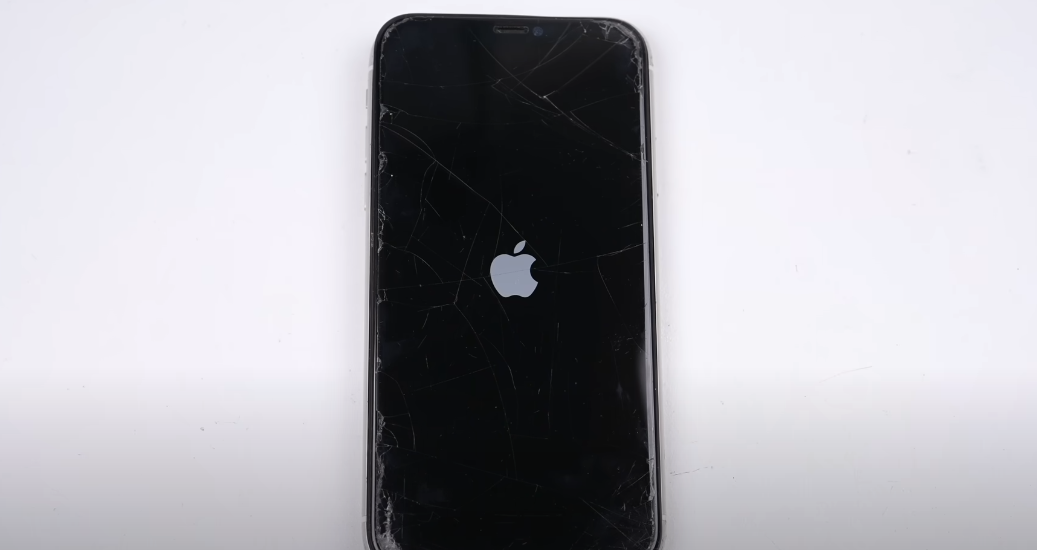
When I powered up the phone, the battery was barely functional, only displaying the boot logo for a few seconds. It was clear that the phone needed a charger to even boot into iOS. Once connected, the system prompted a service notification for the battery, and Face ID was marked as not functional due to the parts pairing system that Apple now uses to track original components. The display was also marked as “unknown,” a sign that it wasn’t the original part.
Before jumping into the repair process, I decided to run a few diagnostic tests using my custom-built app. The app tests over 17 different hardware and software functions, helping me get a better sense of the phone’s overall condition. The obvious cosmetic issues were only the beginning. Here’s what I discovered:
- Wi-Fi, Bluetooth, Cameras, and LED flash were all working fine.
- Proximity sensor: This was the biggest concern. The proximity sensor — responsible for turning off the screen during phone calls to prevent accidental button presses — was behaving erratically. When the screen was sitting against the frame, the sensor was constantly being triggered, but lifting the screen caused it to disengage.
But perhaps the most alarming discovery was the state of the battery. At 78% health, it wasn’t in the best shape, but it wasn’t dead either. However, the phone didn’t last more than a few seconds before shutting off, which meant it needed to be replaced ASAP.
The Plan: A Full Restoration with New Parts
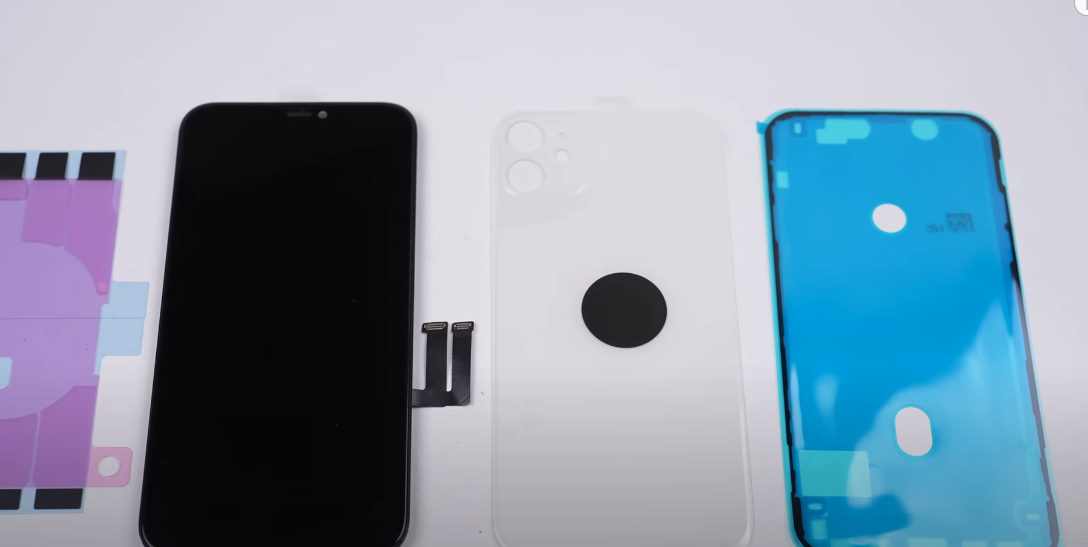
While this phone was in a rough state, it wasn’t beyond saving. The plan was to replace the screen, battery, back glass, and several other internal components, all of which I had sourced for less than $55 (80 AUD). For the cost of a couple of coffees, this phone could be fully restored and made functional again.
Here’s what I would be replacing:
- Battery: The original battery had expanded, causing significant damage to the phone’s internals.
- Display: The display had been replaced before, but it was not done properly and had a cracked protector over it.
- Back Glass: The original back glass had been damaged and removed poorly in the past.
- Volume Flex Cable: The cable that controls the volume buttons and mute switch needed to be replaced.
- Adhesive: New adhesive to ensure all components stayed in place once reassembled.
Step-by-Step Restoration
Step 1: Disassembly and Damage Assessment
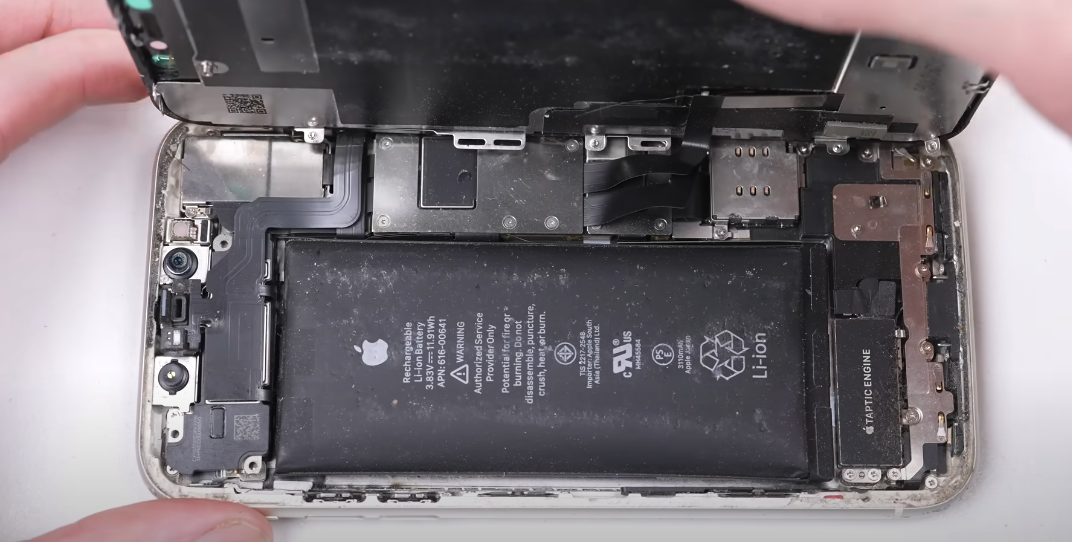
The first task was to remove the damaged parts and recover any loose screws, which the previous repair technician had failed to install properly. The screen had already begun to separate from the frame thanks to the swollen battery, so I didn’t need to pry it up — the battery had done the job for me.
The next step involved removing the earpiece speaker and sensor cable, which had been left loose inside the phone. This was the main reason Face ID wasn’t working — one of the screws had become magnetized and damaged the sensor cable, preventing the system from working properly.
Step 2: Replacing the Battery and Internal Parts
With the damaged parts removed, I proceeded to install the new battery. The original battery had failed dramatically, and its swelling had caused damage to the mute switch cable, which was now ripped. The previous repair person had improperly removed the back glass, causing the frame to separate. This created additional challenges, but I was able to work around it.
To ensure a proper fit for the new back glass, I needed to remove any leftover adhesive from the previous glass. The old adhesive was incredibly strong, so I used a laser machine to burn away the residue and make the area clean.
Step 3: Repairing the Back Glass
When replacing the back glass, I noticed that the original had larger holes around each camera lens, a sign that it had already been replaced once before. To prevent the decorative rings around the cameras from falling out — as they often do when replacing back glass — I used special O-rings. These not only help hold the rings in place but also add a bit of resistance to liquids, though I wouldn’t guarantee a waterproof seal given the phone’s history.
With the adhesive in place, I super-glued the sheet metal back into position. This piece had originally been spot-welded to the frame, but due to the damage, I had to use glue as an alternative.
Step 4: Reassembling the Phone
After the back glass was secured, I began reassembling the rest of the phone. First, I installed the new volume flex cable and mute switch. This was a bit tricky, as the retaining loops had to be carefully bent to ensure the button was secure. Once everything was tightened down and positioned correctly, I moved on to reinstalling the speaker and vibration motor.
At this stage, I also noticed that one of the interconnect pins was slightly deformed. With some careful work, I was able to reposition it and ensure it was correctly aligned.
Step 5: Installing the New Display
With all internal parts installed, it was time to attach the new display. This part can be tricky due to the display cables getting in the way of the battery bracket. Extra care was taken to avoid damaging the cables during installation.
Before adhering the display to the frame, I tested everything once again — including the proximity sensor, which was now working perfectly after a quick unplug and re-plug.
Step 6: Final Assembly and Testing
Once the display was securely in place, I tightened the pentalobe screws and removed the plastic protective film from the display and back glass. The phone was now fully reassembled.
I ran a final test to ensure that everything was functioning properly. The display was slightly darker at the bottom edge, but it was a minor issue that I had seen with brand-new iPhones as well. The phone was now in full working condition, with the battery, display, and proximity sensor all functioning like new.
Conclusion: A Restored iPhone 11 Ready for a New Life
What started as a heavily damaged iPhone 11 with loose screws, a cracked display, and a swollen battery, ended up being a perfectly functional phone with only a few minor imperfections. With a new battery, display, back glass, and several other components, this phone is now ready for its new owner — the builder who previously used an iPhone 7 and will now enjoy the upgraded features of an iPhone 11 without worrying about the phone getting damaged in his line of work.
This repair proves that even the most neglected and poorly repaired devices can still have a second life with the right care and attention. With parts costing less than $55 (80 AUD), the restoration was not only affordable but also rewarding.
If you enjoyed this restoration, be sure to check out my other videos and the restoration playlist. And if you’re looking for used devices or parts, don’t forget to visit my online store, linked in the description.
Thanks for watching, and I’ll catch you next time!