A few months ago, I completed a tear down and repair assessment on Google’s Pixel 7A, and let me tell you, it was a rollercoaster. This seemingly straightforward teardown turned into an unexpected repair saga, where a careless mistake almost rendered the phone completely useless. But with some learning, effort, and a little help from a micro-soldering expert, we got it back up and running. Here’s the story, including lessons learned along the way.
The Initial Teardown: A Promising Start

At first, the Pixel 7A seemed like a device that could be easily repaired. The design of the phone allowed access to the screen separately from the rest of the internals, which should have made disassembly a breeze. But things quickly went sideways. The glue holding the display in place was stubborn, remaining unaffected by heat and making the screen nearly impossible to remove without risking damage.
After reassembling the device, I ran into further issues. The display wasn’t functioning correctly. The brightness was stuck at a very low level and had a greenish tint depending on what was displayed on the screen. Commenters speculated that the heat from opening the display had killed the screen. But as it turned out, that wasn’t the case.
This phone was killed by a plastic spudger.
A Tiny Mistake, A Big Consequence
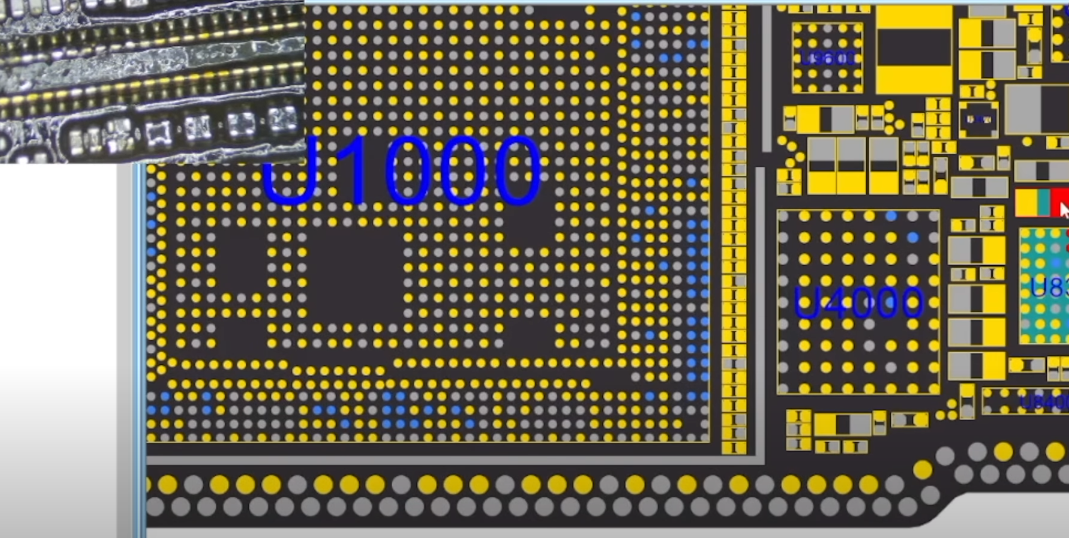
The real culprit behind the damage was a simple mistake. While using a plastic spudger to remove the display, I inadvertently caused harm to the display connector. The connector, surrounded by tiny capacitors and filters, was delicate and vulnerable. Under the microscope, you could see the small, invisible damage I’d caused by prying too hard.
I had never encountered such an issue before, and in all honesty, I was shocked. The Pixel 7A is the only device I’ve ever damaged during a teardown or repair video. It’s not common for components to be placed around connectors like this, and the design of the Pixel 7A left the connector exposed. This seemed to be a design flaw from Google, especially for those trying to repair the device.
Board Repair: My First (and Messy) Attempt
It was time to fix the problem, and I thought, why not give board-level repair a try? I had no prior training or experience, but I figured I could learn. So, I grabbed my tools and dove into micro-soldering. To my surprise, things didn’t go as smoothly as I hoped.
At first, I couldn’t get the solder to melt, and the components wouldn’t reattach. I later realized the problem was that my hot air nozzle was too large. To make matters worse, during this process, I somehow managed to blow away a component entirely. After an extensive search, I found it again, but the damage had been done.
I thought adding some low-melt solder might help, but instead, I made things worse. The tiny components were incredibly delicate, and I ended up putting more solder on the connector than on the components I was trying to reattach. At this point, I knew I was in over my head.
A Helping Hand: Learning from an Expert
Recognizing my limitations, I decided it was time to call in a professional. I reached out to Bill from A1 Mobiles and Repairs, a micro-soldering expert with 25 years of experience in the industry. Bill had the knowledge and tools to get the job done right, and watching him work was a real eye-opener.
The Diagnosis
After taking a look at the board, Bill immediately identified the missing capacitors and filters around the display connector. These small but crucial components were necessary for the display to work correctly. However, Bill also pointed out that capacitors can sometimes be bypassed if there are other capacitors in line to compensate for the loss. He confirmed that the real issue was likely a missing filter.
One of the challenges here was that, without schematics, it was difficult to know exactly which components were needed and where they went. But Bill used his expertise to make educated guesses, focusing on replacing the filter and capacitors.
The Fix
Bill carefully applied heat to soften the flux, then used a combination of soldering iron and hot air to delicately reposition the tiny components. He also took extra care to clean the board, remove any burnt plastic, and reflow the solder where necessary.
One particularly tricky part was replacing the filter, a job that required precision and patience. Despite the challenges, Bill’s steady hands and experience ensured that the job was done right.
The Test
After finishing the micro-soldering work, it was time to test the board. We were both hopeful, but there was no guarantee that everything would work perfectly. Bill powered up the Pixel 7A, and… it worked. The display was back to normal, and everything was functioning as expected.
Reassembling the Pixel 7A
With the board repair completed, it was time to put the phone back together. Using liquid adhesive, I carefully attached the original display back into the frame and clamped it down for a few hours to ensure a strong bond. Once the motherboard was back in place, I reinstalled the upper speaker and the remaining brackets.
For the back panel, I used liquid adhesive again. Since I didn’t have pre-cut adhesive, I improvised by applying a new adhesive around the perimeter and reattaching the LED flash. After the adhesive cured, I removed the clamps, cleaned up the glue residue, and removed the scratched screen protector.
The End Result
The Pixel 7A is now fully functional, albeit with a few imperfections. The repair isn’t perfect, but considering the challenges we faced, it’s a victory. The phone is back in working order, ready to be handed over to a family member.
This repair process taught me a lot—about phone design, micro-soldering, and the importance of precision in board-level repairs. It’s a reminder that even with the best intentions, things can go wrong. But with patience, the right tools, and a little help from an expert, a device can be brought back to life.
A Final Lesson: How to Avoid This Mistake
If you’re planning to repair a Pixel 7A (or similar devices) and want to avoid the same mistake I made, here’s a crucial tip: disconnect the display’s flex cable from the side where there are no components. Don’t touch the back or front, where delicate parts like capacitors and filters are located. This simple step can save you from causing irreversible damage.
Wrapping Up
This repair was far from easy, and it was a humbling experience. But the Pixel 7A is back in action, and I’ve learned valuable lessons along the way. Big thanks to Bill for showing me how to approach micro-soldering repairs with skill and care.
If you’re interested in following along with more device restorations or want to learn more about phone repairs, make sure to subscribe to the channel. Also, if you’re looking for used devices or need a repair, check out my online store—link in the description.